I love displaying photographs of my favorite moments. It seems to make a house feel more like a home, and photos can be excellent conversation starters if you are welcoming guests into your living space. When we moved into our little 900-ish square foot duplex, I quickly realized that the more we put on the walls, the more the rooms shrunk! I love my paintings and pictures Nicolas and I have collected over the years, but it just wasn’t practical for us to hang all of them on our limited wall space. So what could I do to showcase some of my favorite pictures while not smothering our walls and impacting the semblance of open space?
Pinterest. This is my number one go-to for any and all ideas. I knew I wanted to feature family photos in a gallery, but I never thought about putting anything else on the wall with the pictures. After researching on Pinterest, I found the most amazing gallery walls where monograms, hanging plants, shelves exhibiting any kind of neat little trinket and so on were all displaying each family’s unique interests, pictures, or even just home style.
The first thing I did was get all of my picture frames, art, and anything else I thought I may want to hang up together and I traced every one of them on a roll of craft paper. Once they were traced and cut out, I began arranging and rearranging the actual pictures on the floor. Then, when I had committed to a design, I began taping the traced cut outs to the wall. I did use a level to try to get the straightest lines. This idea was given by the following blog, and more details to how to do this are located here: Momtastic. Here’s a few other gallery walls that inspired me! Click on the picture to be directed to their pages.


Once everything was taped (and no, I didn’t take pictures), I measured as close as I could the hanging tabs on every single item. Then I marked the cut outs on the wall to match each item’s measurements. After all of this, I began the process of putting screws into those marks. Once all of the cut outs had screws (in the wall), I removed the paper and hung everything.
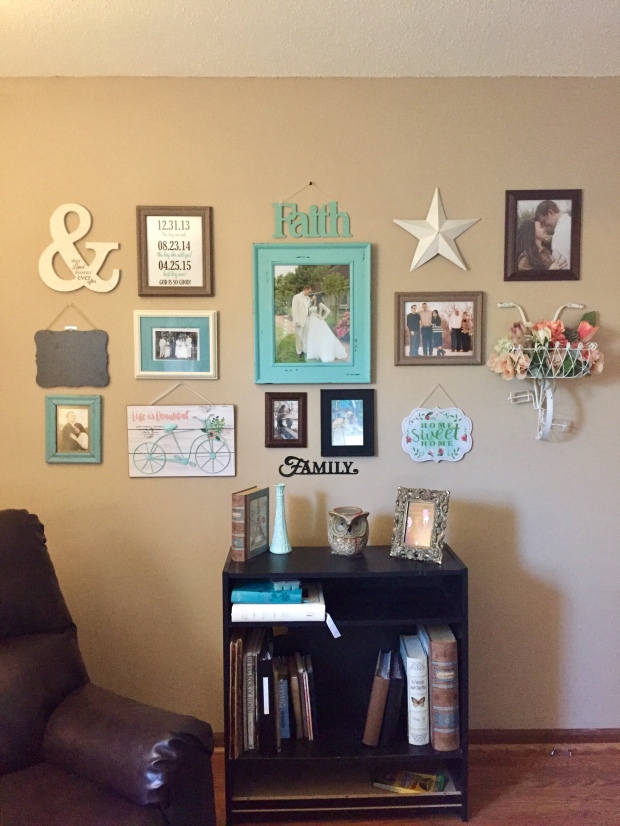
As you can see, I have a lot of space in between everything, and I kind of like that because it will allow me some extra space incase I want to change out anything with bigger pictures or objects. The bike I bought from Hobby Lobby. It pulls a vintage feel into the wall, as well as the LIfe is Beautiful bicycle sign and Home Sweet Home sign from Wal-Mart. Since my husband is from Texas, we had to hang our star.
My husband and I both love teals and mint blues and mint greens, so it makes it really easy to decorate for the both of us. I tried keeping some darker colors and wood frames so it wasn’t completely feminine, while having my creams and touches of pinks that seem to give it my vintage, cottage feel. In all honesty, Nicolas is a cabin décor lover. He’d be happy with the whole house looking like we were in a log cabin, with antler chandeliers, bear blankets, and the works. My ideal home décor is like a French cottage, pastels everywhere, flowers in every room, and natural woods and soft edges throughout the house. Give me floral and I’m happy. So in an effort to please both of us, I’ve opted to lean more towards the farmhouse look with vintage touches. He loves it. I love it. It’s perfect!

I love gallery walls because you can do basically anything you want to. You can do a gallery wall of your family, your wedding, your engagement, a photo shoot, or just your favorite photos! Some gallery walls don’t even have photos but have objects that speak volumes enough about the personality of the family. I hope this inspires you to get started on your own gallery wall! Thanks for reading!